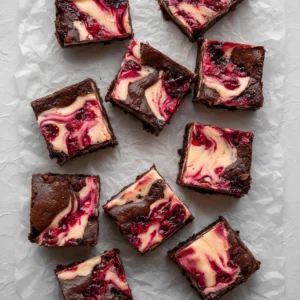
Easy Red Velvet Cheesecake Brownies

If you’re looking to impress your friends and family at your next gathering, look no further than these Easy Red Velvet Cheesecake Brownies. These decadent dessert bars combine the rich, velvety flavor of red velvet with a creamy cheesecake swirl, making them a delightful treat for chocolate lovers. The contrasting textures of the fudgy brownie and the creamy cheesecake create a symphony of flavor in every bite. Perfect for holidays, parties, or just a sweet indulgence, this recipe is sure to become a classic in your baking repertoire. The aesthetic appeal of the vibrant red color also makes these brownies an eye-catching centerpiece for any dessert table, inviting you to dig in. As you prepare these brownies, you’ll enjoy the pleasant aroma wafting through your kitchen, signaling that something delicious is on the way.
Ingredients
- For the Brownie Layer:
- 1 cup (2 sticks) unsalted butter, preferably high-quality for better flavor; using grass-fed butter can add a rich, creamy taste
- 2 cups granulated sugar, which helps achieve a perfect sweetness balance and contributes to the brownie’s fudgy texture
- 4 large eggs, at room temperature for better mixing; room temperature eggs blend more easily, ensuring a smooth batter
- 1 tablespoon vanilla extract, using pure vanilla for maximum flavor impact; avoid imitation vanilla for a richer taste
- 2 cups all-purpose flour, sifted to avoid lumps, creating a silky batter
- 1/2 cup unsweetened cocoa powder, preferably Dutch-processed for a deeper chocolate flavor; this adds to the overall richness of the brownies
- 1 teaspoon baking powder, to help the brownies rise slightly and create a tender crumb
- 1 teaspoon salt, balancing the sweetness and enhancing all flavors, a crucial component in baked goods
- 2 tablespoons red food coloring, for that signature red velvet hue; gel food coloring is recommended for vibrant color without excess liquid
- For the Cheesecake Layer:
- 8 ounces cream cheese, softened to room temperature for easy blending; this ensures a creamy texture in the cheesecake that integrates well with the brownies
- 1/2 cup granulated sugar, to sweeten the cheesecake layer and balance the tanginess of the cream cheese
- 1 large egg, at room temperature for a smoother mixture; like the brownie layer, temperature affects the final texture
- 1 teaspoon vanilla extract, to echo the flavors in the brownie layer, creating a harmonious flavor profile throughout the dessert
Steps / Instructions
- Preheat your oven to 350°F (175°C). Grease and line a 9×13 inch baking pan with parchment paper, allowing the paper to hang over the edges for easy removal later. This step ensures that your brownies come out cleanly without sticking to the pan, making for easier serving and neater slices.
- In a medium saucepan, melt the butter over low heat. Remove from heat and stir in the sugar until well combined. Ensure the mixture is glossy, as this indicates the sugar is properly dissolved; this step is key to achieving a fudgy brownie texture.
- Add the eggs, one at a time, mixing well after each addition. Stir in the vanilla extract. Be attentive to the texture; it should be smooth and slightly thickened after incorporating the eggs, indicating that the mixture is well-emulsified.
- In a separate bowl, sift together the flour, cocoa powder, baking powder, and salt. Gradually add the dry ingredients to the wet mixture, stirring until just combined. Avoid overmixing to maintain a fudgy texture in the brownies; a few flour streaks are acceptable as they will incorporate while baking.
- Mix in the red food coloring until the batter is evenly colored and smooth. The batter should have a vibrant red hue, a hallmark of the Easy Red Velvet Cheesecake Brownies. This step is crucial for visual appeal.
- Pour half of the brownie batter into the prepared baking pan, spreading it evenly across the base. Use a spatula to ensure it reaches the corners for a uniform bake, preventing any undercooked areas.
- In a medium bowl, combine the softened cream cheese and sugar. Beat until smooth. Add the egg and vanilla extract, mixing until incorporated. You want a creamy consistency without lumps for the cheesecake layer; this helps create a seamless blend with the brownie layer.
- Drop spoonfuls of the cheesecake mixture over the brownie layer. Use a knife or skewer to swirl the cheesecake into the brownie batter gently. Create a marbled effect by swirling lightly, being careful not to mix too thoroughly; the goal is to retain distinct layers while achieving a beautiful swirl.
- Pour the remaining brownie batter over the cheesecake layer, spreading it evenly. Swirl the top lightly with a knife for a marbled effect. This adds visual interest and ensures that each bite has a delicious mix of brownie and cheesecake, enhancing the overall experience.
- Bake in the preheated oven for 30-35 minutes, or until a toothpick inserted in the center comes out with a few moist crumbs. Be careful not to overbake, as this can lead to dry brownies; the ideal texture is slightly fudgy in the center.
- Remove from the oven and let cool in the pan for about 10 minutes. Then lift the brownies out using the parchment paper and let cool completely on a wire rack. This cooling step is crucial for achieving the perfect texture before cutting; patience pays off with better results.
- Once completely cooled, cut into squares and enjoy! For clean cuts, use a sharp knife and wipe it between cuts; this prevents the creamy cheesecake from sticking to the knife.
Tips & Tricks
- For the best results, use high-quality cocoa powder and pure vanilla extract to enhance the flavors of your red velvet brownie recipe. This attention to ingredient quality makes a noticeable difference in taste, elevating your dessert from ordinary to extraordinary.
- These brownies can be stored in an airtight container in the refrigerator for up to one week. Allow them to come to room temperature before serving for the best texture. The flavors also develop beautifully over time, making them taste even better the next day.
- If you’re making these brownies ahead of time, they freeze beautifully! Wrap individual squares tightly in plastic wrap and store them in a freezer-safe bag for up to three months. Thaw them at room temperature when ready to enjoy, and they will taste freshly made.
- A common mistake when baking brownies is overmixing the batter. Mix until just combined to ensure fudgy brownies. Remember, fewer ingredients mean less mixing, and this helps keep the texture rich and moist; a light hand is essential.
- For a fun twist on presentation, drizzle some homemade cream cheese frosting on top just before serving. This adds a delightful sweetness and extra creaminess to each bite, making your brownies even more irresistible.
Variations
To customize the Easy Red Velvet Cheesecake Brownies, you can try:
- Substituting the cream cheese for a vegan cream cheese alternative for a dairy-free version. This keeps the delicious taste while accommodating dietary needs and makes it accessible to a wider audience.
- Adding chocolate chips or white chocolate chips for a richer chocolate flavor. You can mix them into the brownie batter or sprinkle them on top before baking to give an extra layer of sweetness and texture.
- For a gluten-free option, use a gluten-free all-purpose flour blend instead of regular flour. Ensure that the blend includes xanthan gum for better texture; this will help mimic the structure that gluten provides in traditional recipes.
- Experimenting with flavored extracts, such as almond or peppermint, to give the brownies a unique taste. A hint of peppermint can be especially festive during the holidays, making these brownies a seasonal favorite.
Serving Suggestions
These decadent chocolate treats are best served warm with a scoop of ice cream or a dollop of whipped cream on the side. Pair them with a rich cup of coffee or a glass of cold milk for a classic American dessert experience. You can also garnish with fresh berries or a sprinkle of powdered sugar for an elegant touch. To elevate your dessert display, consider using decorative plates and adding some mint leaves for a pop of color. Check out our related guide for more tips on presentation and serving ideas that will leave your guests wanting more; your dessert table will be the talk of the gathering!
Easy Red Velvet Cheesecake Brownies
These decadent dessert bars combine the rich, velvety flavor of red velvet with a creamy cheesecake swirl, making them a delightful treat for chocolate lovers.
Ingredients
- 1 cup (2 sticks) unsalted butter
- 2 cups granulated sugar
- 4 large eggs
- 1 tablespoon vanilla extract
- 2 cups all-purpose flour
- 1/2 cup unsweetened cocoa powder
- 1 teaspoon baking powder
- 1 teaspoon salt
- 2 tablespoons red food coloring
- 8 ounces cream cheese
- 1/2 cup granulated sugar (for cheesecake layer)
- 1 large egg (for cheesecake layer)
- 1 teaspoon vanilla extract (for cheesecake layer)
Directions
Preheat your oven to 350°F (175°C). Grease and line a 9x13 inch baking pan with parchment paper.
In a medium saucepan, melt the butter over low heat. Remove from heat and stir in the sugar until well combined.
Add the eggs, one at a time, mixing well after each addition. Stir in the vanilla extract.
In a separate bowl, sift together the flour, cocoa powder, baking powder, and salt. Gradually add the dry ingredients to the wet mixture, stirring until just combined.
Mix in the red food coloring until the batter is evenly colored and smooth.
Pour half of the brownie batter into the prepared baking pan, spreading it evenly across the base.
In a medium bowl, combine the softened cream cheese and sugar. Beat until smooth. Add the egg and vanilla extract, mixing until incorporated.
Drop spoonfuls of the cheesecake mixture over the brownie layer. Use a knife or skewer to swirl the cheesecake into the brownie batter gently.
Pour the remaining brownie batter over the cheesecake layer, spreading it evenly. Swirl the top lightly with a knife.
Bake in the preheated oven for 30-35 minutes, or until a toothpick inserted in the center comes out with a few moist crumbs.
Remove from the oven and let cool in the pan for about 10 minutes. Then lift the brownies out using the parchment paper and let cool completely on a wire rack.
Once completely cooled, cut into squares and enjoy!
Nutrition Facts
Recipe Reviews
- ★★★★★
Excellent recipe!
Leave a Reply
Your email address will not be published. Required fields are marked *


Excellent recipe!