

Fluffernutter Sandwich
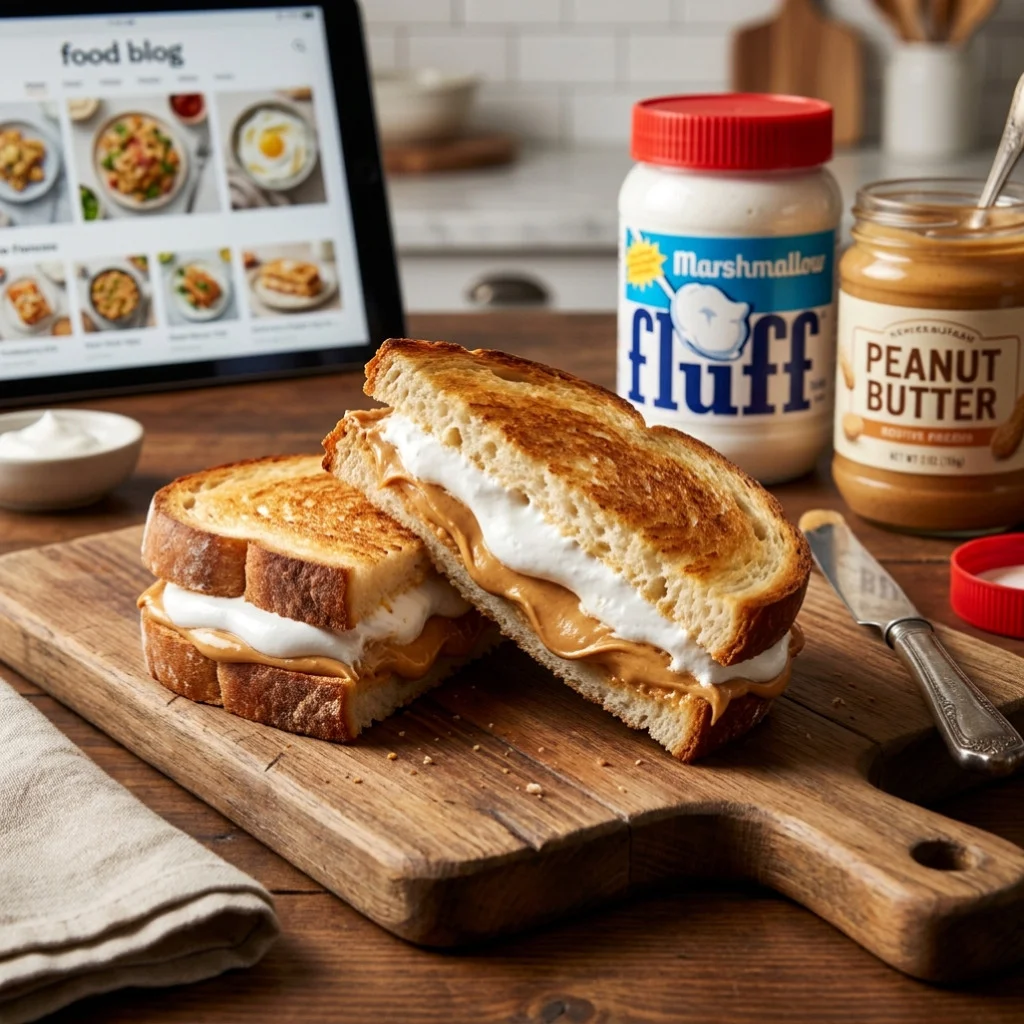
Embrace the nostalgic comfort of the classic Fluffernutter Sandwich—a delightful combination of creamy peanut butter and marshmallow fluff. This quick and easy dessert sandwich is a hit among both kids and adults, making it an ideal choice for lunchboxes or after-school snacks. The Fluffernutter Sandwich not only satisfies sweet cravings but also evokes fond childhood memories, making it a beloved favorite across generations. Let’s dive into the specifics of creating this fluffy masterpiece!
Ingredients
- Bread:
- 4 slices of white bread (or your choice of bread, such as whole wheat, multigrain, or even sourdough for a unique twist; whole wheat and multigrain options offer added fiber and a nuttier flavor)
- Spread:
- 1/2 cup creamy peanut butter (smooth or crunchy based on preference; crunchy adds a delightful texture)
- 1/2 cup marshmallow fluff (look for high-quality brands for the best flavor; homemade marshmallow fluff can also be a fun alternative)
- Toppings (optional):
- 1 banana, sliced (for added sweetness and texture; bananas complement the flavors beautifully)
- 1 tablespoon honey (for drizzling, enhances sweetness and flavor; maple syrup can also be used for a different sweetness profile)
- Cinnamon (for sprinkling, adds a warm, aromatic touch; along with nutmeg, it creates a festive flavor)
Note: For gluten-free options, substitute regular bread with gluten-free bread made from rice or almond flour. For a vegan version, use almond or cashew butter and ensure the marshmallow fluff is vegan, as some brands may contain gelatin. You can learn more about this topic and its history, which dates back to the early 20th century, highlighting its cultural significance in American cuisine.
Steps / Instructions
- Prepare the Bread: Lay out the 4 slices of bread on a clean cutting board or plate. Make sure they are fresh and free from any damage, as stale bread can affect the sandwich’s texture. Consider cutting the crusts off if you prefer a more refined look.
- Spread Peanut Butter: Use a butter knife to evenly spread 1/2 cup of creamy peanut butter on the first two slices of bread. Make sure to cover the entire surface for maximum flavor, reaching the edges to prevent the filling from oozing out. For an extra touch, consider lightly toasting the bread before spreading.
- Add Marshmallow Fluff: On the remaining two slices of bread, spread 1/2 cup of marshmallow fluff equally. This creates that signature sweet and gooey texture, which complements the creaminess of the peanut butter perfectly. A spatula can help achieve a smoother application.
- Combine: Carefully place the peanut butter-covered slices on top of the marshmallow fluff-covered slices, creating two sandwiches. Press down gently to help them stick together, ensuring each bite has a balanced ratio of peanut butter and fluff. You can also gently twist the sandwiches for a fun presentation.
- Toast (optional): If you prefer a warm sandwich, heat a skillet over medium heat. Place the sandwiches in the skillet and cook for about 2-3 minutes on each side, until golden brown and slightly crunchy. Keep an eye on them to prevent burning, and flip carefully using a spatula. A little butter in the skillet can enhance the flavor and crispness.
- Slice and Serve: Once toasted, remove the sandwiches from the skillet and slice them into halves or quarters for easy handling. They can be served immediately while warm or at room temperature, making them perfect for any occasion. Pair it with a glass of milk for an extra delightful experience.
Tips & Tricks
- Storage: Store any leftover Fluffernutter Sandwiches in an airtight container at room temperature for up to 2 days. If making them ahead, keep the peanut butter and marshmallow fluff separate until ready to eat to avoid the bread becoming soggy from the moisture. You may also refrigerate them for a longer shelf life, but be aware that they may lose some of their texture.
- Make-Ahead Options: You can prepare the ingredients in advance and assemble the sandwiches just before serving. This is perfect for parties or picnics, ensuring a quick and easy treat is always ready to go. Pre-slicing fruit and having toppings ready can save time.
- Avoiding Common Mistakes: Make sure your bread is fresh and not stale to enhance the texture. Also, spreading the peanut butter and marshmallow fluff evenly will prevent tearing when you assemble the sandwiches, allowing for a more enjoyable eating experience. Take care to avoid excessive amounts of filling, which can lead to a messy sandwich.
- Pro Technique: For extra flavor, try warming your peanut butter slightly in the microwave for about 10-15 seconds before spreading. This makes it easier to spread and enhances its flavor, resulting in a richer Fluffernutter Sandwich. Consider adding a sprinkle of salt to the peanut butter for an elevated taste.
Variations
While the classic Fluffernutter Sandwich is simply delightful, consider trying some variations to suit your taste: Check out our related guide for more tips on customizing your sandwich experience.
- Nut Butter Alternatives: Swap out peanut butter for almond butter, sunflower seed butter, or any nut butter of your choice for a different flavor profile. Each nut butter brings its unique taste and texture, making your Fluffernutter Sandwich even more exciting. Nut-free alternatives can also be a great option for those with allergies.
- Flavor Add-Ins: Mix a tablespoon of cocoa powder into the marshmallow fluff for a chocolate twist. Alternatively, consider adding a sprinkle of sea salt for a sweet and salty combo that elevates the classic flavor. Cinnamon or vanilla extract can also enhance the overall taste.
- Fruity Options: Add sliced strawberries, blueberries, or other fruits to create a fresh and fruity version of the sandwich. The addition of fruit not only boosts flavor but also adds nutritional value. You can also try dried fruits like cranberries or raisins for a chewy texture.
Serving Suggestions
To elevate your Fluffernutter Sandwich experience:
- Pair with a glass of cold milk or a warm cup of hot chocolate for a delightful treat that complements the sweetness. A coffee with a hint of vanilla could also enhance the experience.
- Serve with fresh fruit on the side, such as apple slices or a handful of grapes, to balance the sweetness of the sandwich and provide a refreshing contrast. A simple fruit salad could also be a pleasing accompaniment.
- Sprinkle with cinnamon or powdered sugar for an elegant touch when serving at gatherings. These small additions can enhance presentation and taste, creating an inviting display for guests.
FAQ
Can I use whole grain bread for a healthier option?
Yes, whole grain bread can be used as a healthier alternative. It adds a nutty flavor and texture to your Fluffernutter Sandwich, enhancing its nutritional profile. Options like sprouted grain bread can also provide added health benefits.
Is marshmallow fluff safe for kids?
Yes, marshmallow fluff is safe for kids; however, always check for allergies, particularly to nuts if you are serving peanut butter. It’s a good idea to supervise younger children when they eat this sweet treat, especially to avoid sticky fingers!
Can I freeze Fluffernutter Sandwiches?
While it’s not recommended to freeze them as a whole, you can freeze the ingredients separately and assemble fresh sandwiches when you’re ready to eat. This keeps the bread fresh and the flavors intact, ensuring a delightful experience every time.
Fluffernutter Sandwich
Embrace the nostalgic comfort of the classic Fluffernutter Sandwich—a delightful combination of creamy peanut butter and marshmallow fluff. This quick and easy dessert sandwich is a hit among both kids and adults, making it an ideal choice for lunchboxes or after-school snacks.
Ingredients
- 4 slices of white bread (or your choice of bread, such as whole wheat, multigrain, or even sourdough for a unique twist; whole wheat and multigrain options offer added fiber and a nuttier flavor)
- 1/2 cup creamy peanut butter (smooth or crunchy based on preference; crunchy adds a delightful texture)
- 1/2 cup marshmallow fluff (look for high-quality brands for the best flavor; homemade marshmallow fluff can also be a fun alternative)
- 1 banana, sliced (for added sweetness and texture; bananas complement the flavors beautifully)
- 1 tablespoon honey (for drizzling, enhances sweetness and flavor; maple syrup can also be used for a different sweetness profile)
- Cinnamon (for sprinkling, adds a warm, aromatic touch; along with nutmeg, it creates a festive flavor)
Directions
Prepare the Bread: Lay out the 4 slices of bread on a clean cutting board or plate. Make sure they are fresh and free from any damage, as stale bread can affect the sandwich’s texture. Consider cutting the crusts off if you prefer a more refined look.
Spread Peanut Butter: Use a butter knife to evenly spread 1/2 cup of creamy peanut butter on the first two slices of bread. Make sure to cover the entire surface for maximum flavor, reaching the edges to prevent the filling from oozing out. For an extra touch, consider lightly toasting the bread before spreading.
Add Marshmallow Fluff: On the remaining two slices of bread, spread 1/2 cup of marshmallow fluff equally. This creates that signature sweet and gooey texture, which complements the creaminess of the peanut butter perfectly. A spatula can help achieve a smoother application.
Combine: Carefully place the peanut butter-covered slices on top of the marshmallow fluff-covered slices, creating two sandwiches. Press down gently to help them stick together, ensuring each bite has a balanced ratio of peanut butter and fluff. You can also gently twist the sandwiches for a fun presentation.
Toast (optional): If you prefer a warm sandwich, heat a skillet over medium heat. Place the sandwiches in the skillet and cook for about 2-3 minutes on each side, until golden brown and slightly crunchy. Keep an eye on them to prevent burning, and flip carefully using a spatula. A little butter in the skillet can enhance the flavor and crispness.
Slice and Serve: Once toasted, remove the sandwiches from the skillet and slice them into halves or quarters for easy handling. They can be served immediately while warm or at room temperature, making them perfect for any occasion. Pair it with a glass of milk for an extra delightful experience.
Recipe Reviews
- ★★★★★
Excellent recipe!
Leave a Reply
Your email address will not be published. Required fields are marked *





Excellent recipe!