

No-Bake Biscoff Cheesecake Lush
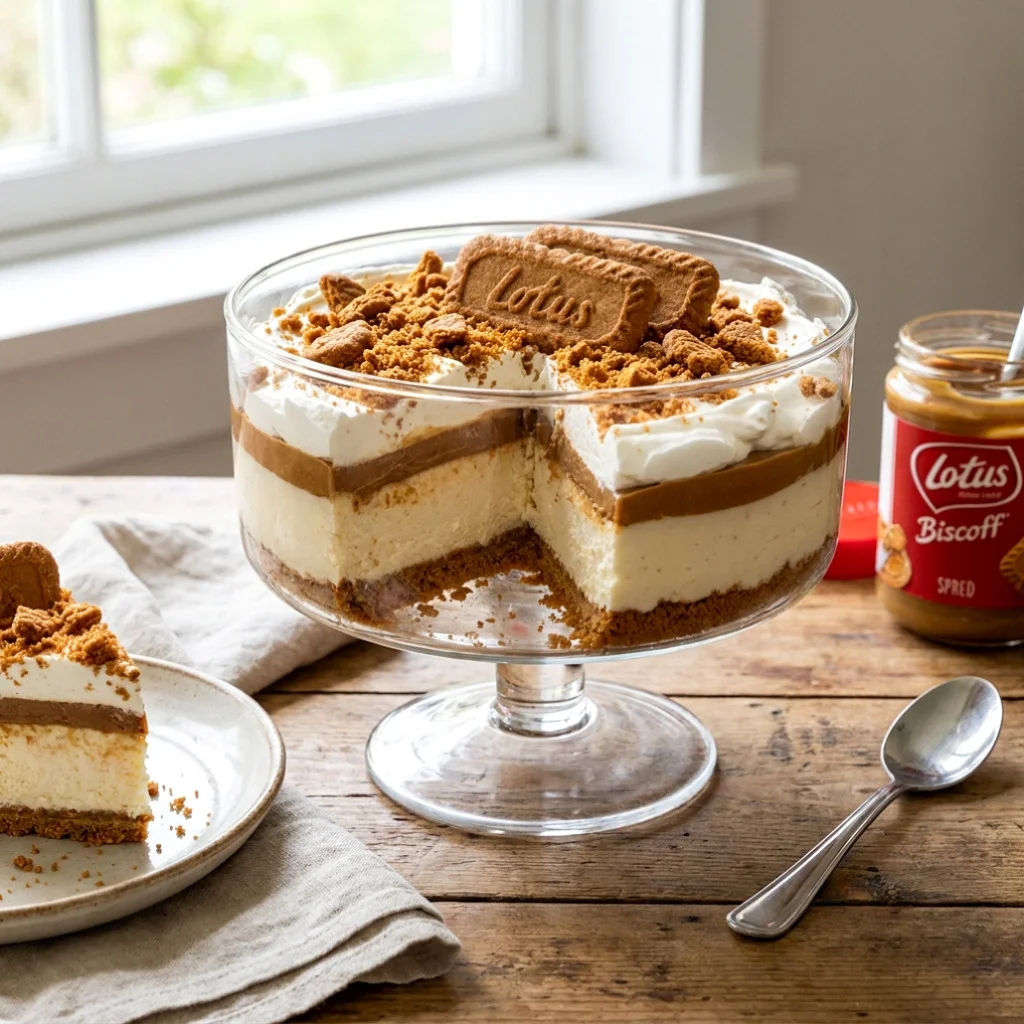
Indulge in the creamy delight of a No-Bake Biscoff Cheesecake Lush, a dessert that perfectly combines the rich flavors of Biscoff cookies with a velvety cheesecake filling. This recipe is simple yet impressive, making it ideal for gatherings or a summer treat. With no baking involved, it’s an easy cheesecake recipe that anyone can master. Let’s dive into the ingredients and steps to create this sweet and creamy dessert that is sure to impress both family and friends alike. The delightful blend of textures and flavors will leave your guests raving about it long after the last bite.
Ingredients
Biscoff Cookie Crust
- 24 Biscoff cookies, crushed, ensuring they are finely ground for a smooth texture. The finer the crumbs, the better the crust will hold together.
- 1/4 cup unsalted butter, melted, which helps bind the crumbs together. Use high-quality butter for the best flavor.
- 2 tablespoons granulated sugar, to add a touch of sweetness to the crust. This will balance the rich flavors of the cookies perfectly.
Cheesecake Filling
- 16 oz cream cheese, softened, allowing for a creamy consistency that blends easily. Make sure to use full-fat cream cheese for the richest flavor.
- 1 cup powdered sugar, which provides sweetness without the graininess of granulated sugar; whisk it in thoroughly for a smooth filling.
- 1 teaspoon vanilla extract, for a lovely aromatic flavor that complements the Biscoff cookies beautifully.
- 1 cup heavy whipping cream, chilled, to create that light and airy texture characteristic of a classic cheesecake filling. Ensure your cream is very cold for best results when whipping.
Toppings
- Crushed Biscoff cookies for garnish, adding both texture and visual appeal. A generous sprinkle will elevate the dish, making it look even more inviting.
- Caramel sauce (optional), which complements the flavors beautifully with its rich sweetness. You can also use chocolate sauce for a different flavor profile.
Note: For a gluten-free version, use gluten-free cookies as a substitute for Biscoff. This way, everyone can enjoy this delightful dessert without worry. You can learn more about this topic and explore additional variations to suit your dietary preferences, making this recipe versatile for all occasions.
Steps / Instructions
- In a medium bowl, combine the crushed Biscoff cookies, melted butter, and granulated sugar. Mix until the crumbs are evenly coated, resembling wet sand. This ensures that every part of the crust has enough moisture to hold together.
- Press the cookie mixture firmly into the bottom of a 9×9-inch or 8×8-inch square baking dish to form an even crust. Use the back of a measuring cup to pack it down tightly. Set aside to allow it to firm up while you prepare the filling; this resting time helps create a solid base.
- In a large mixing bowl, beat the softened cream cheese with an electric mixer until smooth and creamy, ensuring there are no lumps for a silky filling. Take your time here; the smoother your cream cheese, the better the filling will be.
- Gradually add the powdered sugar and vanilla extract to the cream cheese, mixing until well combined and free of lumps. This should take about 2-3 minutes of beating, ensuring a well-integrated mixture that’s sweet and flavorful.
- In a separate bowl, whip the heavy cream until stiff peaks form. This will give your cheesecake filling a light, fluffy texture that’s essential for balance with the dense crust. Be careful not to over-whip, which can change the cream’s texture.
- Gently fold the whipped cream into the cream cheese mixture until fully incorporated. Be careful not to deflate the cream—use a spatula to lift and fold instead of stirring vigorously; this maintains the airy quality of the whipped cream.
- Pour the cheesecake filling over the prepared Biscoff cookie crust, smoothing the top with a spatula for an even finish. This should create a beautiful layer atop your crust, making it visually appealing.
- Cover the dessert with plastic wrap and refrigerate for at least 4 hours, or overnight for best results, to allow the cheesecake to set adequately. This chilling time is crucial for the best texture, as it allows the flavors to meld together.
- Once set, remove from the refrigerator and garnish with crushed Biscoff cookies and a drizzle of caramel sauce if desired. This not only enhances the flavor but also adds a rustic touch to your presentation; it’s the perfect finishing touch!
- Slice into squares and serve chilled. Enjoy your indulgent treat, relishing the delightful mix of creamy and crunchy textures! The contrast between the smooth filling and the crunchy crust makes every bite a delight.
Tips & Tricks
- Make sure your cream cheese is at room temperature for easy blending and a smooth filling; this usually takes about 30 minutes to an hour out of the fridge. This step is essential for achieving a silky texture.
- For a more intense Biscoff flavor, consider adding a few teaspoons of Biscoff spread into the filling, which will amplify the cookie’s signature taste throughout the dessert, creating a deeper flavor experience.
- This dessert can be made ahead of time and stored in the refrigerator for up to 5 days, making it perfect for parties or gatherings. Just keep it covered to maintain freshness and prevent it from absorbing odors.
- To prevent the crust from becoming soggy, ensure that you press it firmly into the dish and refrigerate it long enough to set before adding the filling. A well-formed crust is key to the structure of your No-Bake Biscoff Cheesecake Lush.
- Common mistakes to avoid include over-mixing the whipped cream, which can lead to a grainy texture, and not allowing enough chilling time for the cheesecake to firm up—patience is key here! Ensure every step is executed with care for the best results.
Variations
While the classic No-Bake Biscoff Cheesecake Lush is a crowd-pleaser, consider these variations: Check out our related guide for more tips. Each variation offers a unique twist on the original recipe, perfect for different occasions.
- Swap Biscoff cookies with Oreos for a chocolate twist, creating an Oreo cheesecake lush, which is perfect for chocolate lovers looking for a rich dessert.
- Try adding layers of different flavors, like a fruit puree, for a fruity cheesecake variation, which could include flavors such as strawberry or raspberry for a refreshing contrast to the rich cheesecake.
- For a vegan version, substitute cream cheese with a vegan cream cheese alternative and use coconut cream instead of heavy cream, maintaining the lush texture while keeping it plant-based, ensuring that everyone can enjoy this delicious treat.
Serving Suggestions
Serve your No-Bake Biscoff Cheesecake Lush chilled, with a side of fresh berries or a scoop of vanilla ice cream for added indulgence. A hot cup of coffee pairs beautifully with this creamy dessert, enhancing the flavors of the Biscoff cookies. Consider garnishing the individual servings with a sprig of mint or a drizzle of chocolate sauce for an extra touch of elegance. You could also serve it alongside a light fruit salad, which provides a refreshing contrast to the rich cheesecake, making it an ideal dessert for any season.
No-Bake Biscoff Cheesecake Lush
Indulge in the creamy delight of a No-Bake Biscoff Cheesecake Lush, a dessert that perfectly combines the rich flavors of Biscoff cookies with a velvety cheesecake filling. This recipe is simple yet impressive, making it ideal for gatherings or a summer treat.
Ingredients
- 24 Biscoff cookies, crushed
- 1/4 cup unsalted butter, melted
- 2 tablespoons granulated sugar
- 16 oz cream cheese, softened
- 1 cup powdered sugar
- 1 teaspoon vanilla extract
- 1 cup heavy whipping cream, chilled
- Crushed Biscoff cookies for garnish
- Caramel sauce (optional)
Directions
In a medium bowl, combine the crushed Biscoff cookies, melted butter, and granulated sugar. Mix until the crumbs are evenly coated, resembling wet sand.
Press the cookie mixture firmly into the bottom of a 9x9-inch or 8x8-inch square baking dish to form an even crust.
In a large mixing bowl, beat the softened cream cheese with an electric mixer until smooth and creamy.
Gradually add the powdered sugar and vanilla extract to the cream cheese, mixing until well combined.
In a separate bowl, whip the heavy cream until stiff peaks form.
Gently fold the whipped cream into the cream cheese mixture until fully incorporated.
Pour the cheesecake filling over the prepared Biscoff cookie crust, smoothing the top with a spatula.
Cover the dessert with plastic wrap and refrigerate for at least 4 hours, or overnight for best results.
Once set, remove from the refrigerator and garnish with crushed Biscoff cookies and a drizzle of caramel sauce if desired.
Slice into squares and serve chilled.
Recipe Reviews
- ★★★★★
Excellent recipe!
Leave a Reply
Your email address will not be published. Required fields are marked *





Excellent recipe!